
My mate Stense is a big fan of street art, as we are nowadays supposed to refer to wanton vandalism. In particular, Stense likes the stencil art made famous by Banksy. I must admit, despite my broadly conservative views on so-called artists who express themselves on private property without the owner's permission, I like it too.
So, for her birthday present in September 2006, I decided to have a go at making a stencil of Stense. For obvious reasons, I dubbed it a Stensil.
If you'd like to have a go at making your own Stensil, please feel free to use these handy A4-sized templates [PDF, 47kb]. For information about how to create your own templates from scratch, and how to spray your Stensil, read on:
Creating the templates
The templates were created from a photograph, which was manipulated and then traced as per the following pictures (more details below):


Step 1: Choose a suitable photo and load it onto your computer. (I used this one.)
Step 2: Use an image-manipulation program to convert the photo into a suitable two-colour image. (I used Paintshop Pro, fiddled around with the contrast, converted to greyscale, then reduced the number of colours to two.)
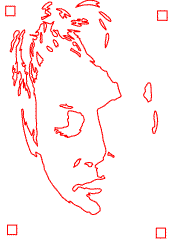
Step 3: Trace the edges of the image using a suitable software package. (I used Microsoft Powerpoint's autoshapes/lines/curve facility.)
Step 4: Delete the original image to leave just the outline image. I then added small squares in each corner to make lining up the templates easier when applying the paint (see below).
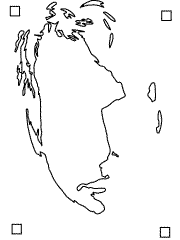
Step 5: Make two copies of the outline image. On the first copy, delete all areas that will be black on the final image.
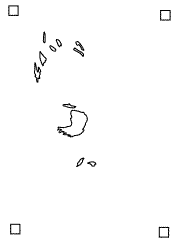
Step 6: On the second copy, delete all areas that will be white on the final image.
You now have two templates, which you should print onto card (paper is no good).
Cutting out the templates
I cut out the templates with a small, sharp craft knife. I tried scissors, but these were no good—I couldn't get a smooth enough edge, and couldn't get into the tight corners.
I found the easiest way to cut was towards myself, turning the card as I went.
You need to be particularly careful not to tear the card when cutting out areas that are close to each other. Stense's hair was a complete nightmare in this regard. I found the best way to do this was to cut the two edges that were closest together first, then gradually move away.
Do not underestimate how long it takes to cut out the templates. (You have no idea, Stense, you really don't!) It is also sensible to take frequent stress breaks!
Applying the paint
I painted my Stensil onto hardboard using spray paint. I sprayed the black background first, then left it to dry. Then I did the following:


Step 7: I placed the first (white) template on the black background and weighed it down with several small weights. (This was to try to ensure that the edges of the template were in contact with the hardboard, so that the white paint would not bleed underneath the template. It wasn't wholly effective, but, in the event, I think the bleeding added rather nicely to the overall artistic effect.) I then applied the white spray paint, making sure not to forget to spray the small corner-squares mentioned above. I then removed the template and let the white paint dry.
Step 8: I carefully aligned the small corner squares on the second (black) template with the ones sprayed onto the board in the previous step. I then weighed down the cardboard and sprayed on the black paint. I then removed the template, and made sure (using a bit of spare card as a mask) that the corner squares were fully obliterated with black paint. I then let the black paint dry.
Step 9: Finally, I applied a white caption using a lettering template I had prepared in a similar manner to the other templates.
Et voilà!
The finished product:
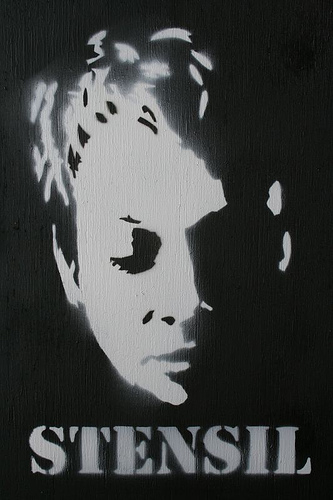
I am both pleased and relieved to report that Stense was suitable impressed with her birthday present.
See also: How to make your very own Scary Stense greetings card